One Hour Heating & Air Conditioning: Giving Back to the Johnson County Community

One Hour Heating & Air Conditioning: Giving Back to the Johnson County Community

At One Hour Heating & Air Conditioning of Johnson County, we believe that true success is measured not just by the services we provide but by the impact we have on our community. That’s why, in 2024, we’ve dedicated our Fridays to making a difference at Kansas City Hospice House, a place that offers compassion and comfort to patients and their families during challenging times.

What is Kansas City Hospice House?

Kansas City Hospice House is part of Kansas City Hospice and Palliative Care, an organization committed to bringing expert care, peace of mind, comfort, guidance, and hope to people affected by life-limiting illnesses or grief. Their services include hospice care, palliative care, pediatric care, and grief support through the Solace House. The Hospice House itself is a sanctuary for patients who may need additional care and support in their final days. It provides a calming, home-like environment where families can focus on their loved ones while having access to professional medical care.

Patients typically stay at the Hospice House for 3-4 days, a crucial period that allows them to spend their remaining time surrounded by loved ones in a tranquil setting. It’s an alternative to the clinical atmosphere of a hospital, offering a more personal and compassionate experience. Beyond medical care, the Hospice House fosters a sense of dignity, community, and connection during a challenging time.

A Tradition of Giving Back

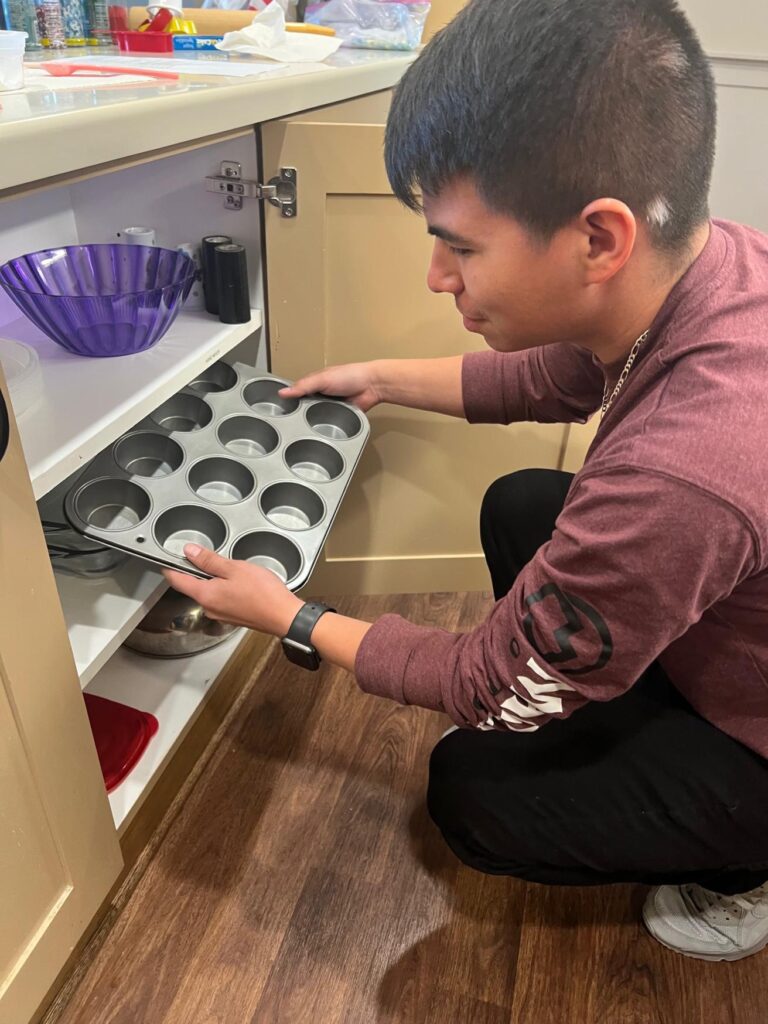
Every Friday, three of our team members volunteer their time at Kansas City Hospice House to support their incredible mission. Our volunteers engage in a variety of activities, all designed to bring joy and comfort to the residents and their families. From baking homemade treats to creating Chiefs-themed hearts for patients’ doors, our team is committed to brightening each Friday. Additionally, we’ve spent time painting birdhouses, changing out air filters, and helping with landscaping to beautify the outdoor spaces around the Hospice House.

Join Us in Supporting Kansas City Hospice House

We’re proud to support the Kansas City Hospice House, but their mission depends on the generosity of the entire community. If you’d like to learn more about their work or find ways to get involved, visit their website at kchospice.org. Together, we can make a lasting difference.

A Commitment to Community

As we look ahead to 2025, One Hour Heating & Air Conditioning of Johnson County remains committed to serving both your home comfort needs and the greater good of our community. Whether it’s through expert HVAC services or heartfelt volunteering, our goal is always the same: to create a positive impact in the lives of those around us.

Volunteer Photo Gallery

We’re excited to showcase some of our team’s memorable moments from volunteering throughout the year. Scroll through our photo gallery to see how we’ve been making a difference at Kansas City Hospice House—one Friday at a time!

One Hour Heating and Air Conditioning of Johnson County Named a “2024 Nextdoor Neighborhood Fave” in Nextdoor’s Local Business Awards

Neighborhood Faves 2024

One Hour Heating and Air Conditioning, located in Olathe, Kansas, has been named a 2024 Nextdoor Neighborhood Fave business, the annual awards program that recognizes local businesses loved by neighbors.

“This year’s Neighborhood Fave businesses represent the outstanding service providers, local spots and eateries that are an essential part of our everyday lives,” said Nirav Tolia, Chief Executive Officer of Nextdoor. “We’re thrilled to celebrate these important members of the community, but more importantly, being a Neighborhood Fave is good for business. Congratulations to all of this year’s winners.”

Selected by volume of neighbor ‘Faves’ and recommendations on the platform from the past year, the Neighborhood Faves awards recognizes the most beloved local businesses on Nextdoor. Used by one in three households in the US, Nextdoor is the essential neighborhood network where neighbors, public agencies, and businesses connect around local information that matters.  In a May 2023 Nextdoor survey, 94% of Nextdoor neighbors report valuing recommendations for products, services, and businesses from their Nextdoor neighbors and Neighborhood Faves winners receive six times more recommendations on their respective Business Pages.

“We are grateful to our clients for nominating us for this significant award. Being named as a Nextdoor “Neighborhood Favorite” is an honor that we share with our entire team. We have a wonderful group of technicians and administrative staff that work incredibly hard to provide the best service possible to our neighbors here in Johnson County.” – Jonathan Blachly, owner of One Hour Heating and Air Conditioning

The complete list of winning businesses is available at nextdoor.com/favorites. Join the neighborhood network by downloading the Nextdoor app in your favorite  app store  or visiting nextdoor.com.

Air Conditioner Not Cooling? The Most Common AC Repair in Olathe

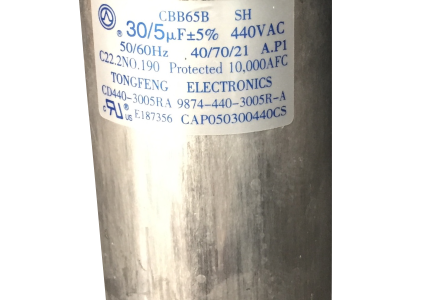
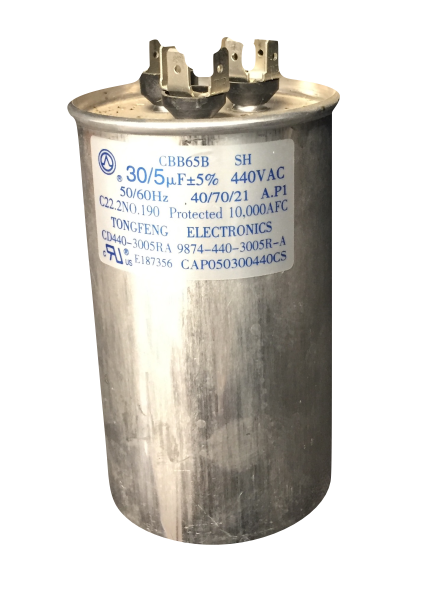
air conditioner capacitor

Is Your Air Conditioner Acting Up? It Might Be the Capacitor

Summer heat can be brutal, and an air conditioner not cooling properly is the last thing you need. One of the most common culprits behind a struggling AC unit is a failing capacitor. Here’s why this happens and how you can prevent it…

What is an AC Capacitor?

An air conditioner capacitor is a small but crucial component that stores electrical energy. This energy is then released to help start the compressor and fan motors. Without a functioning capacitor, your AC unit simply won’t turn on or will struggle to operate efficiently.

Why Does the Capacitor Fail?

Capacitors have a lifespan, typically between 5 and 10 years. Over time, the internal components degrade, leading to reduced performance and eventual failure. Other factors that can accelerate capacitor failure include:

  • Power surges: Sudden spikes in electricity can damage the capacitor.
  • Overheating: Extreme temperatures can shorten the capacitor’s life.
  • Age of the unit: Older air conditioners are more likely to experience capacitor issues.

Signs of a Bad Capacitor

If you suspect your capacitor might be failing, look for these common symptoms:

  • Compressor doesn’t start: The most obvious sign is when the compressor fails to kick in.
  • Humming noise: A humming sound coming from the outdoor unit could indicate a capacitor problem.
  • Reduced cooling efficiency: If your AC is running but not cooling as effectively as before, it might be a capacitor issue.

Preventing Capacitor Failure

While you can’t completely prevent capacitor failure, there are steps you can take to extend its lifespan:

  • Regular maintenance: Schedule annual tune-ups for your AC unit. A professional can inspect the capacitor and identify potential issues early on.
  • Surge protection: Install a surge protector to shield your AC unit from power spikes.
  • Proper care: Keep the area around your outdoor unit clear of debris to prevent overheating.

Important note: Working with electricity can be dangerous. It’s best to call a professional HVAC technician.

How to Change Your Furnace Filter (There Is A Right Way And A Wrong Way!)

In this comprehensive guide, we’ll delve into the correct way to change your furnace filter, emphasizing the importance of directional arrows and highlighting the fact that the same filter is used during both heating and cooling seasons.

Understanding the Importance of Furnace Filters

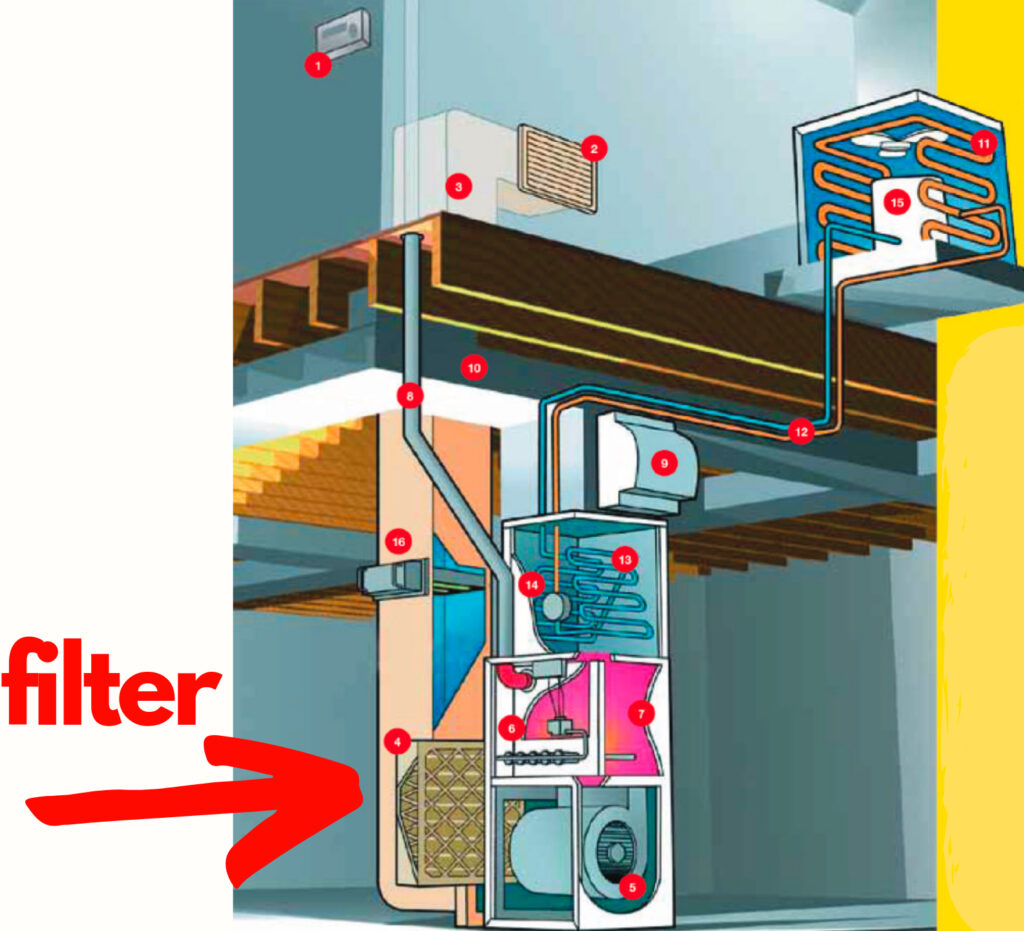
where to find your furnace filter

Furnace filters play a pivotal role in maintaining indoor air quality and ensuring the efficiency of your HVAC system. They trap dust, debris, pet dander, and other airborne particles, preventing them from circulating throughout your home. A clean filter facilitates proper airflow, which is essential for efficient heating and cooling. Neglecting filter maintenance can lead to decreased indoor air quality, reduced system efficiency, and increased energy consumption. There is a correct (and incorrect way) to change your furnace filter. We’ll teach you below how to change your furnace filter.

Identifying the Correct Filter

Identify the size of your current filter by checking the dimensions printed on the existing filter or measuring the filter slot. It’s important to choose a filter that fits snugly within the filter housing to prevent air leakage around the edges.

Also, consider the MERV (Minimum Efficiency Reporting Value) rating of the filter, which indicates its effectiveness in trapping airborne particles. Higher MERV ratings correspond to finer filtration but may impede airflow if not compatible with your system’s specifications. Consulting your HVAC system’s user manual or contacting a professional technician can provide valuable guidance in selecting the appropriate MERV rating.

Take into account any specific filtration needs, such as allergies or pet dander, which may require a specialized filter type. By carefully considering these factors, you can ensure that you choose the correct filter to maintain optimal indoor air quality and HVAC system efficiency.

Steps to Properly Change Your Furnace Filter

Let’s walk through the correct procedure for changing your furnace filter:

  1. Turn Off the Furnace: Safety first! Switch off your furnace before attempting any maintenance tasks. Locate the power switch on your furnace and set it to the off position.
  2. Locate the Filter: The filter is typically situated near the return air duct or blower compartment. It may be behind a panel or grille that requires removal. Refer to your furnace’s user manual if needed.
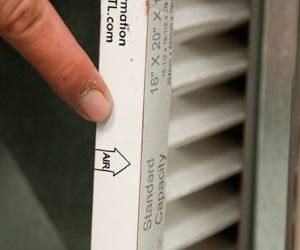
  3. Note Filter Direction: Most furnace filters feature directional arrows indicating the airflow direction. These arrows are crucial for proper installation. Take note of the airflow direction before removing the old filter. The arrows point toward the furnace.
  4. Remove the Old Filter: Carefully slide out the old filter from its slot. Take note of any accumulated dust or debris around the filter housing for cleaning if necessary.
  5. Insert the New Filter: Align the new filter with the directional arrows facing toward the blower or furnace. Ensure a snug fit within the filter housing to prevent air leakage.
  6. Replace Cover or Panel: If you removed a cover or panel to access the filter, securely reattach it.
  7. Turn On the Furnace: Once the new filter is in place, you can safely turn the furnace back on. Listen for any unusual noises that may indicate an installation issue.
  8. Set a Reminder: To maintain optimal system performance, set a reminder to replace the filter every one to three months, depending on usage and filter type.

Changing your furnace filter is a simple yet crucial task that impacts both indoor air quality and HVAC system efficiency. By following the correct procedure, including paying attention to directional arrows, you can ensure proper airflow and comfort in your home throughout the year. At One Hour Heating and Air Conditioning, serving Johnson County, Kansas, we’re committed to helping homeowners maintain healthy and comfortable indoor environments through expert HVAC services. If you have any questions or need assistance with your furnace maintenance, don’t hesitate to reach out to us.

The Crucial Role of Professional Dryer Vent Cleaning: Why DIY Isn’t Enough

Why is dryer vent cleaning essential? Over time, lint, dust, and debris accumulate in your dryer vent. This build up hinders airflow and causes the dryer to work harder to dry clothes. This not only decreases the efficiency of the dryer, which leads to longer drying times and higher energy bills, but also poses a severe fire risk.

According to the U.S. Fire Administration, failure to clean dryer vents is a leading cause of residential fires.

When it comes to cleaning dryer vents, the equipment used by professionals differs significantly from what homeowners typically have at their disposal. Here’s a breakdown of the key differences:

  1. High-Powered Vacuums: Professional dryer vent cleaners utilize industrial-strength vacuums with powerful suction capabilities. These vacuums are designed to effectively remove lint, dust, and debris from the vent system, ensuring thorough cleaning and optimal airflow. Homeowners may have household vacuum cleaners, but they often lack the suction power needed to adequately clear out built-up lint and other obstructions.
  2. Rotary Brushes: One of the most essential tools used by professionals is a rotary brush system. These brushes feature rotating bristles that scrub the interior walls of the dryer vent, dislodging stubborn debris and ensuring a comprehensive clean. Rotary brushes come in various sizes and configurations to accommodate different vent sizes and configurations. While homeowners may attempt to use manual brushes or makeshift tools, they lack the efficiency and effectiveness of professional-grade rotary brush systems.
  3. Flexible Rods and Extensions: Professional dryer vent cleaners have access to flexible rods and extensions that enable them to reach deep into the vent system, even in hard-to-reach areas. These flexible tools allow for thorough cleaning of the entire length of the vent, from the dryer to the exterior exhaust vent. Homeowners may struggle to reach certain sections of the vent system without the proper equipment, leaving behind hidden pockets of lint and debris.
  4. Video Inspection Cameras: Many professional dryer vent cleaning companies use video inspection cameras to assess the condition of the vent system before and after cleaning. These cameras provide a detailed view of the interior of the vent, allowing cleaners to identify any obstructions, damage, or signs of wear and tear. Homeowners typically do not have access to such specialized equipment, making it challenging to conduct a thorough inspection of the vent system.
  5. Safety Gear: Professional dryer vent cleaners prioritize safety and often wear protective gear such as gloves, goggles, and respiratory masks. This equipment helps protect them from exposure to dust, debris, and potentially harmful substances that may be present in the vent system. While homeowners can certainly wear protective gear during DIY cleaning attempts, they may not have access to the same level of professional-grade equipment.

Overall, the equipment used by professional dryer vent cleaners is specifically designed to deliver thorough, efficient, and safe cleaning results. While homeowners may attempt to clean their dryer vents using household tools and DIY methods, they often lack the necessary equipment and expertise to achieve the same level of cleanliness and safety. Entrusting the task to professionals ensures that the vent system is properly cleaned and maintained, reducing the risk of fire hazards and optimizing the performance of the dryer.

To schedule a free estimate for a dyer vent cleaning, please click here and select “get a quote.”

What is a Pan Treatment? Keep the Gunk Out of Your AC…

It’s time to discover the transformative power of a pan treatment during your preventative maintenance visit with One Hour Heating and Air Conditioning in Olathe, Kansas. Here’s why this service is more than just routine maintenance—it’s a game-changer for your HVAC system:

What is a Pan Treatment?

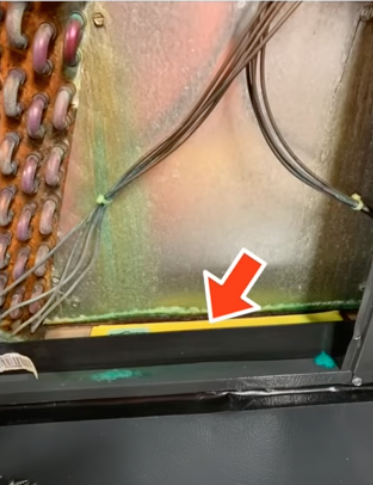
pan treatment to stop water leaks and mold build up in your air conditioner

A pan treatment for an air conditioner coil drain pan involves the application of specialized cleaning agents or treatments to maintain the cleanliness and functionality of the drain pan within your HVAC (heating, ventilation, and air conditioning) system.

The drain pan is a crucial component that collects condensation generated by the cooling process. Over time, this condensation can accumulate debris, slime, mold, mildew, and other contaminants, potentially leading to clogs and drainage issues.

The yellow you see in the photo to the left is a pan treatment protecting the indoor coil.

Prevents Costly Water Damage

Is your air conditioner leaking water on the inside? Without proper maintenance, slime, mold, and mildew can accumulate over time, leading to blockages in the condensate drain. This can result in water backing up into your system, causing flooding and potentially damaging your property. With a pan treatment, you can proactively prevent these issues, saving yourself from expensive repairs down the line.

Eliminates Harmful Bacteria

The dark, damp environment of your drain pan is the perfect breeding ground for bacteria. Left unchecked, these microorganisms can not only compromise your indoor air quality but also pose health risks to you and your family. Our pan treatment includes the use of a non-toxic cleaner to thoroughly sanitize the pan, ensuring that harmful bacteria are eliminated, and your indoor air remains clean and fresh.

Maintains System Efficiency

A clean drain pan and hoses are essential for the smooth operation of your HVAC system. When these components are clogged with debris and gunk, it can restrict airflow and cause your system to work harder than necessary, leading to decreased efficiency and higher energy bills. By incorporating a pan treatment into your preventative maintenance routine, you can keep your system running at peak performance, saving you money in the long run.

Easy and Convenient Maintenance

At One Hour Heating and Air Conditioning in Olathe, Kansas, we make it easy for you to keep your HVAC system in top condition. Our experienced technicians will perform a thorough pan treatment during your preventative maintenance visit, ensuring that your drain pan and hoses are clean and free of any buildup. With just a yearly pad change recommended, maintenance couldn’t be simpler, allowing you to enjoy peace of mind year-round.

Don’t wait until disaster strikes to take care of your HVAC system. Invest in a pan treatment during your preventative maintenance visit with One Hour Heating and Air Conditioning in Olathe, Kansas, and enjoy the benefits of a cleaner, more efficient system. Schedule your appointment today and take the first step towards a healthier, more comfortable indoor environment. Your HVAC system will thank you for it!

Furnace Repair in Olathe, Kansas

furnace-filter-direction

Welcome to our comprehensive guide on residential furnace repairs in Olathe, Kansas. We hope to be your go-to resource for navigating the challenges of maintaining a reliable heating system in the heart of the Midwest.

As temperatures plummet during the winter months, ensuring your furnace operates at peak efficiency becomes essential for a cozy and comfortable home. In this blog post, we’ll delve into common furnace issues that Olathe residents often encounter. We explore DIY checks to troubleshoot problems, and offer insights into when it’s time to call in professional help.

Whether you’re a homeowner seeking preventative maintenance tips or grappling with a sudden heating breakdown, our guide aims to empower you with the knowledge to keep your furnace running smoothly in the face of Kansas’s chilly weather.

What are the most common furnace problems?

In Olathe, residents often encounter common furnace problems that can disrupt their home heating systems.

1. One prevalent issue is a malfunctioning thermostat, which can lead to inconsistent heating or no heat at all.

2. Faulty ignitors or pilot lights are also frequent culprits, causing the furnace to fail to ignite and produce warmth.

3. Another common problem is dirty or clogged filters, hindering proper airflow and reducing the efficiency of the heating system.

4. Additionally, issues with the blower motor, such as wear and tear or electrical failures, may result in inadequate circulation of heated air throughout the home.

furnace-filter-direction

Olathe’s cold winters emphasize the importance of addressing these common furnace problems promptly to ensure residents stay warm and comfortable in their homes. Regular maintenance and timely repairs can help prevent these issues and keep residential heating systems running smoothly during the chilly seasons.

Regularly replacing or cleaning the air filter is a simple but crucial maintenance task that can prevent such issues and help keep the furnace operating efficiently. It’s recommended to check and replace the air filter at least every few months, especially during peak heating seasons.

What can do yourself if your furnace is not working?

If your furnace is not working, there are several checks you can perform yourself before calling a professional. Keep in mind that if you’re not comfortable or familiar with these tasks, it’s always advisable to seek assistance from a qualified technician. Here are some furnace checks you can do:

  1. Thermostat Settings: Ensure that the thermostat is set to the desired temperature and mode (heating). Replace the thermostat batteries if needed.
  2. Power Supply: Check if the furnace is receiving power. Make sure the circuit breaker for the furnace is not tripped, and verify that the furnace switch is turned on.
  3. Air Filter: Inspect the air filter and replace it if it’s dirty or clogged. A dirty filter can restrict airflow and lead to various issues.
  4. Fuel Supply: For gas furnaces, confirm that the gas supply is turned on. If you suspect a gas leak, leave your home immediately and contact the gas company.
  5. Vents and Registers: Make sure all vents and registers are open and unobstructed. Blocked vents can impede airflow.
  6. Condensate Drain: If your furnace has a condensate drain, ensure it is not clogged. A blocked drain can cause the furnace to shut down.
  7. Inspect Flue and Exhaust Pipe: Check for any blockages or obstructions in the flue or exhaust pipe. Blocked vents can be a safety hazard.

If, after performing these checks, your furnace still doesn’t work, it’s recommended to contact a licensed HVAC professional to diagnose and address the issue. Safety is paramount when dealing with heating systems, so exercise caution and seek professional help if needed.

What is the typical lifespan of a furnace?

The typical lifespan of a furnace varies depending on factors such as the type of furnace, the quality of its installation, and how well it’s maintained. On average, a gas furnace can last anywhere from 15 to 30 years. However, if a furnace is never maintained we have seen them needing major repairs or even replacement after just 10 years.

Regular maintenance, timely repairs, and the quality of installation play crucial roles in extending a furnace’s lifespan. If a furnace is well-maintained and experiences minimal wear and tear, it is more likely to operate efficiently for a longer duration.

Additionally, factors like energy efficiency and technological advancements may prompt homeowners to upgrade their furnaces before the end of their expected lifespan.

Expert Strategies to Quiet Your HVAC System

The replacement of a residential HVAC system is a significant investment, aimed at improving efficiency, energy savings, and overall comfort. Most homeowners focus on the efficiency ratings and technological advancements of the new unit. However, one often overlooked factor is the importance of sheet metal transitions on the HVAC system’s noise level.

Understanding Sheet Metal Transitions:

Sheet metal transitions play a crucial role in HVAC systems. They serve as a connection between the air handler and the ductwork. These transitions guide the airflow smoothly and efficiently through the system, ensuring optimal performance. However, the construction of these transitions influence not only their durability but also the amount of noise generated during operation.

The Noise Factor:

HVAC systems can produce varying levels of noise. For homeowners, reducing this noise is often a priority. Traditional sheet metal transitions, when not properly reinforced, can act as sound amplifiers, allowing vibrations and turbulence to escape and resonate throughout the ductwork and living spaces. HVAC system noise can be reduced with proper installation techniques.

The Solution: Adding a Cross Break

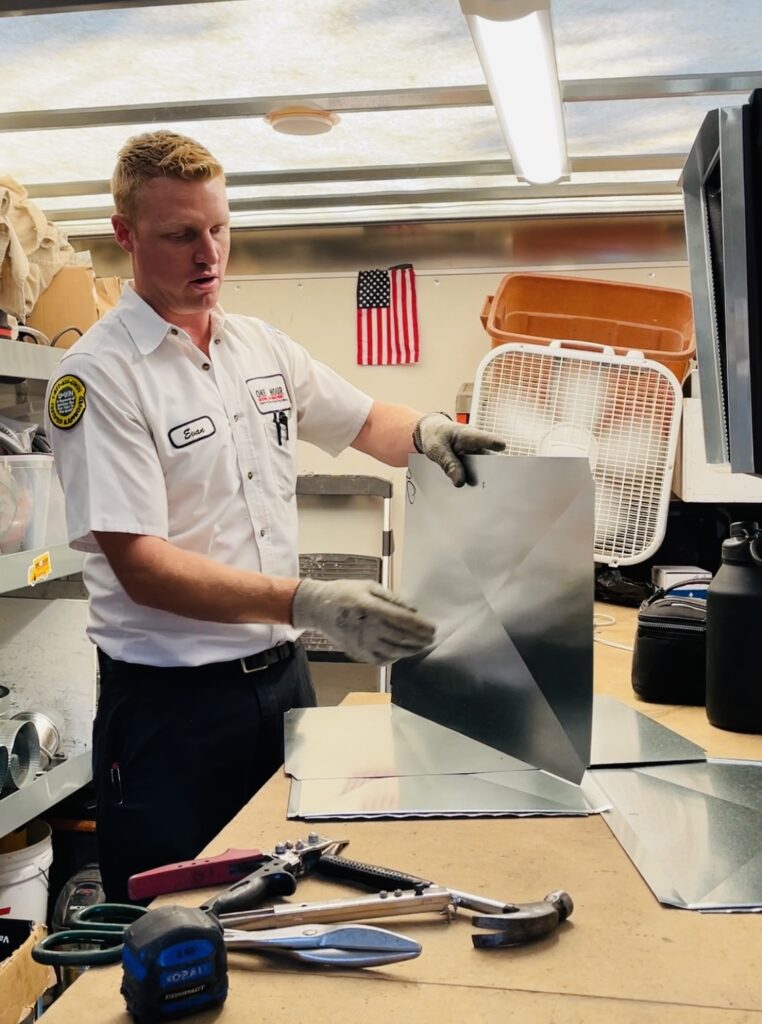
One Hour Heating and Air Conditioning Technician in Olathe, KS creating a cross break in a duct work return.

One effective way to mitigate noise in sheet metal transitions is by incorporating a cross break into their design. A cross break involves forming a raised ridge or indentation across the surface of the metal, increasing its structural integrity and reducing the likelihood of vibrations and noise transmission.

Benefits of Cross Breaks in Sheet Metal Transitions:

  1. Noise Reduction: The primary advantage of incorporating cross breaks is the significant reduction in noise levels. Homeowners can enjoy a quieter and more comfortable living environment, especially in spaces where HVAC noise might be more noticeable.
  2. Longer Lifespan: The added strength and durability provided by cross breaks can extend the lifespan of the sheet metal transition, reducing the likelihood of wear and tear over time.
  3. Energy Efficiency: Improving airflow through the system can contribute to increased energy efficiency. With less resistance and turbulence, the HVAC system can operate more smoothly, potentially resulting in energy savings.

Before You Replace Your Residential HVAC System in Johnson County, KS:

While upgrading your HVAC system is an excellent way to enhance home comfort and energy efficiency, don’t overlook the impact of sheet metal transitions on noise levels. By incorporating a simple design element like a cross break, you can significantly reduce the noise generated by your HVAC system. The goal is to create a more peaceful and enjoyable indoor environment for you and your family.

When investing in a new HVAC system, consider working with professionals who prioritize not only technological advancements but also the finer details, ensuring that your entire system operates seamlessly and quietly.

Click here to schedule a free estimate to replace your residential HVAC system.

Enjoy this video of Evan, an HVAC Installation Technician with One Hour Heating and Air Conditioning in Olathe, KS explain the importance of adding a cross break to a sheet metal transition.

Evan with One Hour Heating and Air Conditioning shares why he adds a cross break in the sheet metal transition when he replaces HVAC systems.

Evaporator Coil Guide: Where is it located, how does it work, and why does it leak?

leaking evaporator coil

In the realm of residential HVAC systems, the air conditioner coil plays a vital role in maintaining your indoor comfort. However, over time, you might encounter a rather common and frustrating issue – refrigerant leaks. These leaks can lead to reduced cooling efficiency, increased energy bills, and an overall uncomfortable environment. We’ll delve into the intricacies of how an air conditioner coil, attached to the indoor furnace, can develop refrigerant leaks, and explore a solution that holds promise for improved longevity and performance.

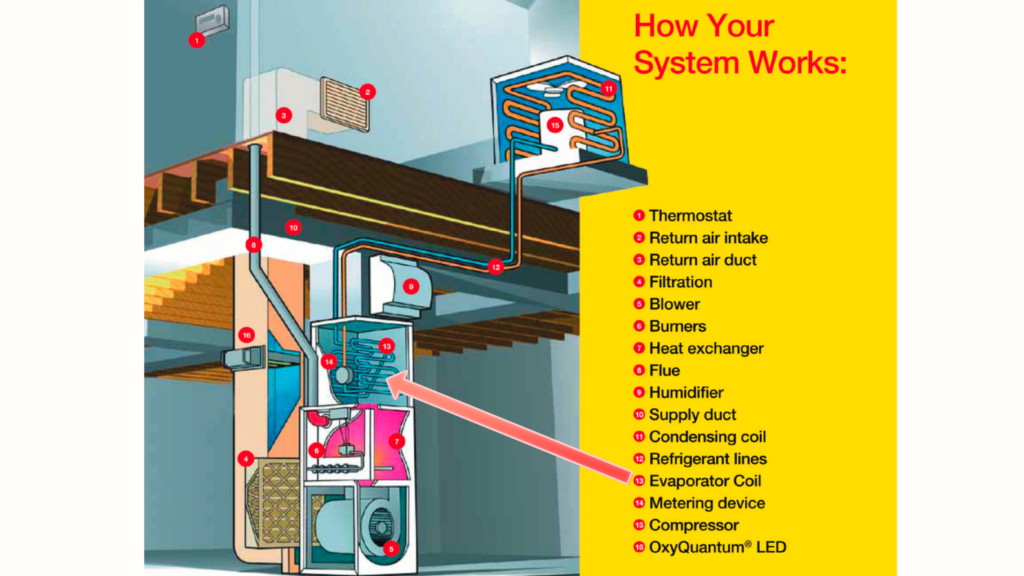
Where is Your Air Conditioner’s Coil Located?

Found either within the air handler or attached to the furnace, this coil is nestled within the ductwork or plenum of your home. Its concealed location ensures that the coil efficiently absorbs heat from the indoor air, playing a crucial role in the cooling process.

How Does the AC Coil Work?

As warm air flows over the coil’s cold surfaces, the refrigerant within the coil evaporates, absorbing heat and subsequently cooling the air before it’s circulated back into your living spaces. This fundamental process underscores the significance of the evaporator coil in maintaining the comfort and climate control of your home.

This coil facilitates the transfer of heat from inside your home to the outside environment by using refrigerant – a specialized fluid that undergoes phase changes to absorb and release heat.

How Evaporator Coil Holes Lead to Refrigerant Leaks

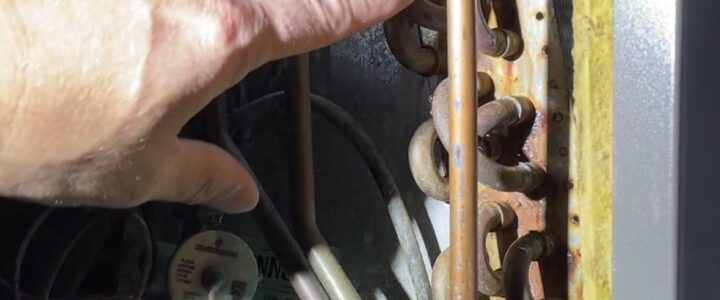
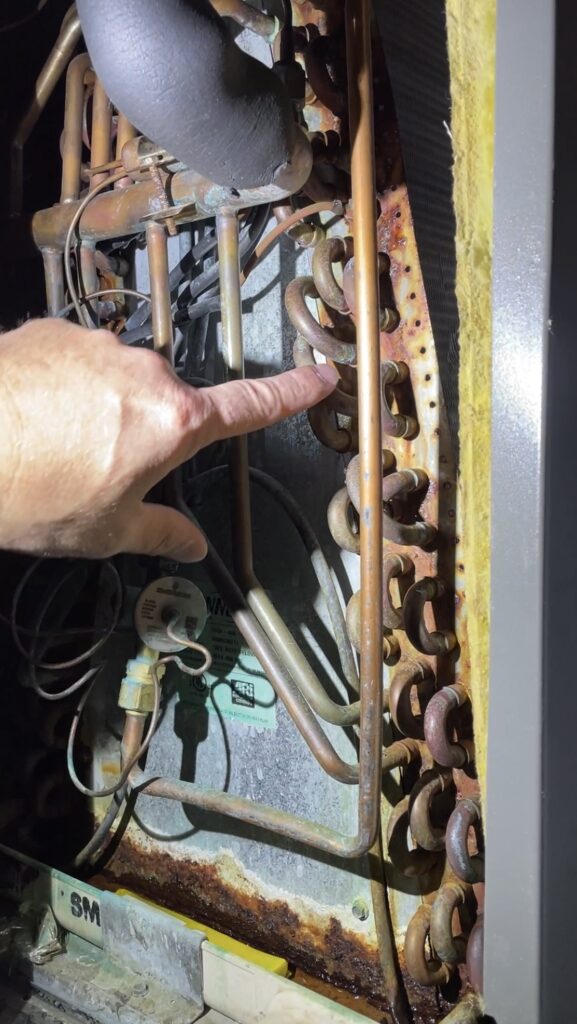
Refrigerant leaks can stem from various sources, and one common culprit is a hole in the evaporator coil. When a hole forms in the coil, whether due to corrosion, wear and tear, or other factors, it creates a pathway for the refrigerant to escape. This compromised coil allows the high-pressure refrigerant to leak into the surrounding environment. The result is not only a loss of cooling efficiency but also a potential environmental concern. Detecting and repairing such leaks promptly is crucial to restoring the system’s performance, maintaining optimal energy efficiency, and minimizing the impact on both comfort and the environment.

VOCs in the Air: An Often Overlooked Culprit

One factor that might contribute to coil leaks is the presence of volatile organic compounds (VOCs) in the air. VOCs are emitted by a range of household products like cleaning supplies, paints, adhesives, and even certain types of furniture. When these compounds come into contact with the coil’s surface, they can lead to a chemical reaction that corrodes the coil over time, causing leaks.

Dissimilar Metals: A Potential Cause of Evaporator Coil Leaks

In our experience, we have noticed that AC coils that utilize dissimilar metals are more prone to developing leaks. This phenomenon is due to a process called galvanic corrosion, where different metals in contact with each other can create a flow of electrical current, leading to the deterioration of one or both metals. This corrosion can compromise the structural integrity of the coil, resulting in tiny openings that allow refrigerant to escape.

Precision Leak Detection: Unveiling Evaporator Coil Leaks

air conditioner coil with a refrigerant leak.

An experienced HVAC service company employs a range of advanced techniques to accurately detect leaks in your evaporator coil. One of the primary methods involves using electronic leak detectors, which can sense the presence of refrigerant escaping from even the tiniest holes.

HVAC service professionals at One Hour Heating and Air Conditioning pinpoint the location and severity of leaks swiftly and accurately, ensuring timely repairs and optimal system performance.

The All-Aluminum Solution

To mitigate the risk of refrigerant leaks caused by galvanic corrosion, HVAC technology has evolved. Newer coils are often made entirely of aluminum, eliminating the potential for dissimilar metal interactions. Aluminum is highly resistant to galvanic corrosion, making it an ideal choice for coil construction.

Benefits of All-Aluminum Coils

  1. Enhanced Longevity: With no dissimilar metals in contact, all-aluminum coils are less susceptible to galvanic corrosion, leading to a longer lifespan for the coil and the entire HVAC system.
  2. Efficiency Boost: Reduced risk of leaks ensures that your AC system operates at peak efficiency, effectively cooling your home while saving energy and reducing utility costs.
  3. Peace of Mind: Installing all-aluminum coils brings homeowners peace of mind, knowing that they’ve invested in a durable, reliable, and long-lasting solution.

Understanding the intricate relationship between your air conditioner’s evaporator coil and refrigerant leaks is pivotal in maintaining the efficiency and comfort of your home’s HVAC system. By installing all-aluminum coils, you’re proactively addressing the potential for galvanic corrosion, ensuring a reliable cooling experience for years to come. One Hour Heating and Air Conditioning in Olathe, KS, is committed to quality and innovation in our choice of materials, benefiting both our customers and the environment.

Remember, regular maintenance, timely repairs, and informed decisions can make a substantial difference in the performance and longevity of your HVAC system. Stay cool, comfortable, and informed with One Hour Heating and Air Conditioning, your reliable partner in residential HVAC solutions.

The Unsung Hero of Your Air Conditioner: The Capacitor

If you’re a homeowner, you probably know how crucial your air conditioner is, especially during these hot midwest summers. However, the inner workings of HVAC systems might remain a mystery to many.

One essential component that plays a significant role in your AC’s operation is the capacitor.

Let’s demystify the air conditioner capacitor, explaining what it does and why replacing it preventatively can save you money in the long run.

What is an Air Conditioner Capacitor?

air conditioner capacitor

To put it simply, an air conditioner capacitor is an electrical component that stores and releases energy to help start and run the AC’s motors.

Think of it as a temporary battery that assists in generating the necessary power to kickstart the compressor and fan motors, which are crucial for cooling your home. Without a functioning capacitor, your air conditioner won’t be able to function efficiently, or worse, it might not work at all.

The Significance of Routine Maintenance:

Your air conditioner’s capacitor is under constant stress, as it’s involved in every cooling cycle.

Over time, due to this stress and natural wear and tear, capacitors can weaken or even fail. Routine maintenance is the key to ensuring your HVAC system operates smoothly and efficiently.

During a professional maintenance visit from One Hour Heating and Air Conditioning in Olathe, an HVAC technician will inspect and test the capacitor. If they notice that the capacitor’s performance is declining, they’ll recommend replacing it preventatively. This proactive approach helps you avoid sudden breakdowns during the hottest days when your AC is working at its maximum capacity.

The Cost-Effective Nature of Preventative Replacement of an Air Conditioner Capacitor:

Here’s the catch: Replacing a capacitor preventatively is considerably more cost-effective than waiting for it to fail. When a capacitor reaches the end of its life, it can cause significant problems in your HVAC system.

A failed capacitor can lead to:

a. Reduced Cooling Efficiency: An aging capacitor might not deliver the necessary power to run the motors efficiently, leading to decreased cooling performance and higher energy bills.

b. Stress on Other Components: When a capacitor fails, other parts of the HVAC system, like the compressor or fan motor, might have to work harder to compensate. This increased strain can lead to premature wear and even more expensive repairs.

c. Potential AC Breakdown: In the worst-case scenario, a failed capacitor could cause your entire air conditioner to stop working. Emergency repairs can be costly and often require immediate attention.

Ensuring Comfort and Peace of Mind:

Replacing your air conditioner capacitor preventatively not only saves you money but also ensures that you and your family remain comfortable throughout the hot summer months. Regular maintenance, including capacitor checks and replacements, helps maintain peak performance, efficiency, and longevity of your HVAC system.

As a responsible homeowner, it’s essential to understand the role of an air conditioner capacitor and its significance in keeping your HVAC system running smoothly.

By scheduling routine maintenance and replacing the capacitor preventatively, you can save money, avoid sudden breakdowns, and ensure that your air conditioner operates at its best when you need it most.

Trusting qualified HVAC professionals from One Hour Heating and Air Conditioning for regular inspections and repairs is the key to a cool and comfortable home.

Book Now
Call Us Now